
If you are a developer, you have more than likely been confronted, one day or another, with one of the following scenarios:
- When you arrive at work in the morning, you get the latest version of the sources to be up to date. You try to build and, seeing the errors, you ask yourself the question that annoys: what is the #! @ $% Who made his check-in while it does not build ?
- A rule requires you to archive all your changes at the end of the day, so that other participants can access them during your absence. Unfortunately, if it does not compile, we are confronted with the previous case.
- In case of code review, you must either check in and risk impacting your colleagues, or ask the person responsible for this task to come to your computer or send all your sources.
- One morning, when you arrive at your post, you find that your computer has returned the soul. And of course, the source backup does not contain the last changes you made and kept locally.
If you analyze all these situations, you will find that the origin of each problem is common: the local changes that are made are not present on the server until the check-in is requested. This is where the shelvesets come to our rescue. A shelveset is a set of changes made by a user and placed on the server for a period that is, in principle, rather short. What is the difference with a changeset you say? Let’s see this together:
Changesets |
Shelvesets |
|
|
Among these differences, the versioning is probably the most important. Because the shelvesets do not interfere with the versions of the changesets. Let’s say, for example, that I have files checked out. At the end of the day, I would like my changes to be accessible by the rest of the team in my absence, without creating a new version with a changeset. I can then create a shelveset. People who want to access it can do so via the Unshelve option. This allows to check all the files in the shelveset and to recover all the modifications made by its creator. But what is important is that people who will retrieve the latest version of the sources will not be impacted by these changes. They will retrieve the latest changesets.
To clarify a little, I will now describe the process of creating and retrieving a shelveset. As a starting point, let’s take a project attached to Team Foundation Server and on which I have some files already modified. Among the various scenarios described above, I will take the simplest, namely that I want to place my modifications on the server without interfering with the latest version available. So I can not create a new changeset via check-in. Instead, I have to create a shelveset. To do this, a command is provided in the pending changes window (Figure 1), or simply via the source control options in the context menu of the explorer solution (Figure 2).
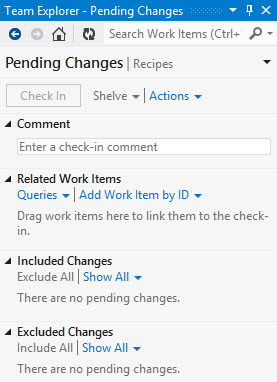
Figure 1

Figure 2
When you select this option, the pending changes window opens with additional options (Figure 3). You will have the possibility to select the files you want to include in the shelveset, add a comment, see work items, notes, etc. Note the possibility of keeping your changes locally so that you can continue working.
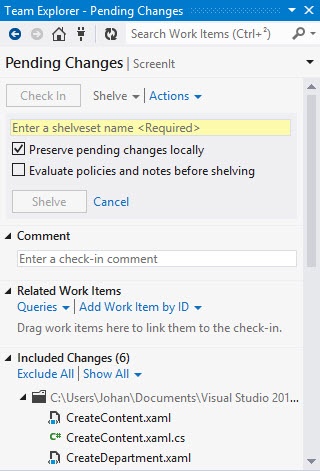
Figure 3
All you have to do is click on the Shelve button to validate the creation of the shelveset. And now, all your changes are on the server. This ensures your changes in the event of a problem since they will be included in the backups of the server. Let’s now go to the recovery of an existing shelveset. This operation can be carried out not only by the creator of the shelveset, but also by any user having sufficient rights. To do this, simply go back to the pending changes window and click the Find Shelvesets button under the Action menu (Figure 4).

Figure 4
This leads you to another view in which you can search for shelvesets by user (Figure 5).
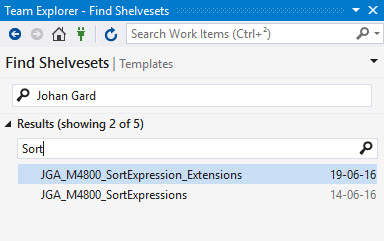
Figure 5
When you right click on a shelveset, you have the possibility to delete it, unshelve (without any option though), ask for a review or see the shelveset details (Figure 6).
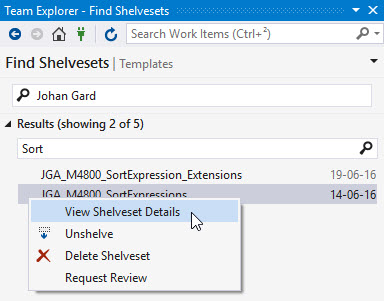
Figure 6
If you select the View Shelveset Details option then you will see all the comment and all changes that compose the shelveset. You still find there the other options you had in the search screen (Figure 7).
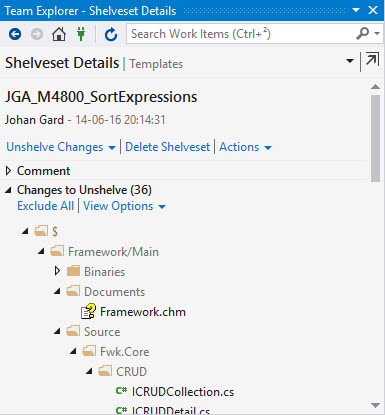
Figure 7
When you click the Unshelve Changes action link, two additional options appear before you actually unshelve (Figure 8).
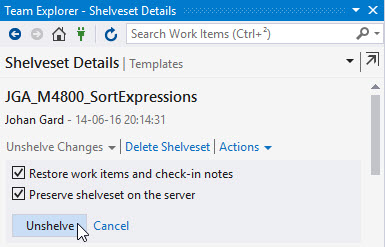
Figure 8
